
Business Card File Setup Specifications
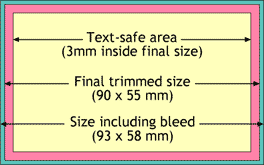
Our business card templates are 93 x 58 mm, which includes the bleed (the green area in the image below). So when you create the PDF, there is no need to tick any check boxes to “include bleed” (which works in some programs but not in others).
We print on SRA3 size card (320 x 450 mm). Our RIP will step up the cards and add the crop marks etc. Our guillotine is programmed to trim to those crop marks. When creating your PDF please make sure there are NO CROP MARKS, REGO MARKS, etc.
Text Safe Area:
Our standard text safe area is 3mm smaller on each edge than the finished size of the card. Inside this area is safe for all information to be as well as graphics. If there is any text or graphics outside this area then the margins will be uneven and your card will not look centred. There is even a chance that some image or text will get cut off when the job is trimmed.
Bleed:
When an image or a colour is printed to the edge of a page, the image or colour should extend at least 1.5mm past the edge so that when the page is trimmed on a guillotine, small variations in the trim will not result in a white line down the edge of the page.
Here are a few tips to follow to ensure a smooth workflow:
- All colours to be CMYK, RGB or PMS (Pantone Matching System). NO HSV or INDEX COLOUR files!
- Check your specified colours against the CMYK or PMS Colour chart. Screen colours generally don’t match or give a true reflection of what will print.
- All pictures need to be 300dpi at actual printed size for maximum quality; any bigger is a waste of space, any smaller the quality drops! Don’t go by the size you see displayed on your screen - see here for an explanation on resolution.
- Images off Web Pages are NOT generally acceptable quality. Either check them in the appropriate software, or let us have a look if you’re unsure. Check here for an explanation why.
Can’t create a PDF on your PC?
If you are running Windows Vista, you will have available a printer called Microsoft XPS Document Writer. This printer will create an XPS file which we can convert to PDF.
To print to the XPS Document Writer
- Open the document or file that you want to print to .xps format, and then click Print. In most programs, the print option is available from the File menu.
- In the Print dialog box, select Microsoft XPS Document Writer.
- To view the document using the XPS viewer after you print it, click Preferences (or Properties), click the XPS Documents tab, and then make sure that the Automatically open XPS documents using the XPS viewer check box is selected.
- Click OK, then click on Advanced Print Settings in the bottom left. Click the Page Settings tab and make sure that under Printers Marks the Crop Marks check box is NOT checked.
- Click OK, then OK again to print your document.
- When prompted, enter a file name and browse to the location where you want to save the .xps file. Windows will save .xps files in your Documents folder by default.
- Upload this file to our website when you come back to order your business cards online.
What if the XPS Document Writer is not available on your system?
There are little programs available on the web. We use the easyPDF Printer from BCL Technologies, which can be downloaded here: http://www.pdfonline.com/easypdf/index.htm. There is a free trial available, but it puts a watermark on your PDF. You’ll need to pay for this little program to remove the watermark. It only costs US$29.95 though.
Once it’s installed on your system, you can use it to create PDF’s from virtually any program on your PC.